Appearance
IntelliTrack VeriMy™ Quick Reference Guide
Enable VeriMy for your devices from the IntelliTrack web console, check devices out and in, and find a missing device with Mark as Lost, Locate and RADAR.
Welcome to VeriMy
Welcome to IntelliTrack VeriMy™. VeriMy simplifies the monitoring, location tracking, and assignment of mobile devices, ensuring seamless operations, reduced downtime, and lowering replacement costs. With automated device check-in/check-out, health monitoring, and real-time location tracking organizations can maximize productivity and device utilization while minimizing device loss, repair, and replacements. VeriMy is an add-on to the IntelliTrack IT Assets bundle.
Advantages to VeriMy
VeriMy delivers the following advantages:
- Rapid installation and implementation
- Support for multiple manufacturers devices
- Manage thousands of devices across multiple locations
- Prevent access to device applications until user is verified
- Administration and reporting through your IntelliTrack tools
- Optional use of “Assignees” to minimize the need for IntelliTrack User Licenses
Contact Information
We are headquartered in Baltimore, Maryland.
Telephone (toll free in USA): 1-888-412-7226
Mailing Address:
DecisionPoint Technologies
3840 Bank St.
Baltimore MD 21224
USA
Website address
www.intellitrack.com
Email address
Sales: info@decisionpt.com
Support: tech.support@decisionpt.com
Getting Started
To use VeriMy ensure:
- Your devices are running Android 8.1 or later, and from a supported manufacturer
- Your devices are listed as Assets in IntelliTrack IT Assets
- You have an adequate number of VeriMy device licenses available
Enabling and Disabling VeriMy
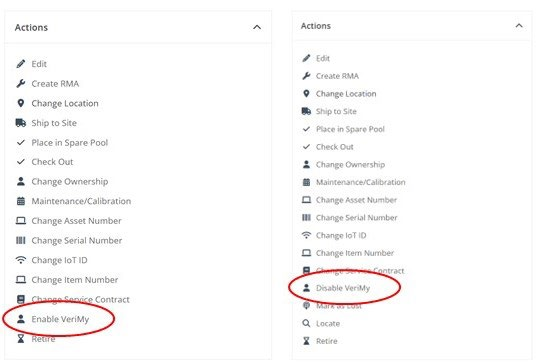
Enabling VeriMy applies a VeriMy device license to your device. Disabling VeriMy frees up a license. There are three ways to enable and disable VeriMy for devices through the IntelliTrack web console.
- Toggling between Enable VeriMy and Disable VeriMy in the Assets Details screen
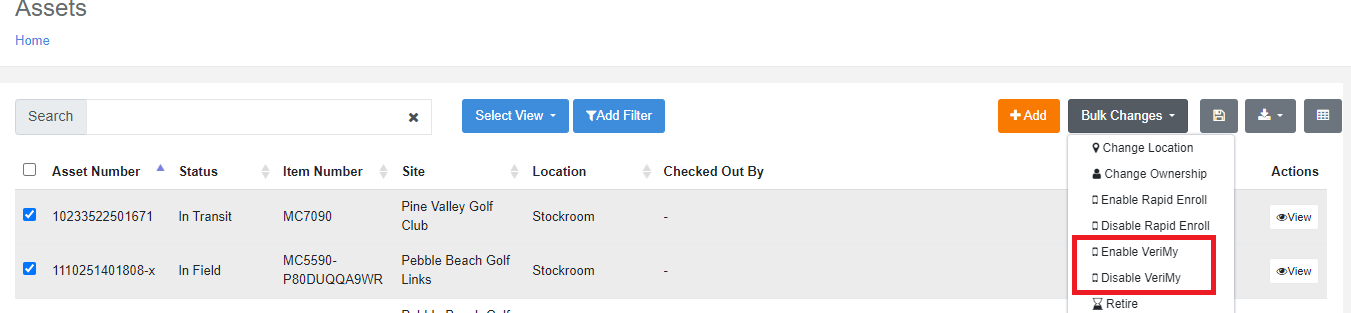
- Performing Bulk Changes in the Assets screen
- When adding or updating assets via the import feature
When processing an RMA, it is recommended to enable VeriMy upon receipt and restaging.
Toggling between settings in the Assets Details screen
You can enable or disable VeriMy for a single device by navigating to Home > Assets > Assets, searching for and selecting View for a device. Upon launching the View Asset page, you will see an action to either Enable or Disable VeriMy. Tapping will toggle the selection.
Performing Bulk Changes in the Assets Screen
You can enable or disable VeriMy for a single device by navigating to Home > Assets > Assets and checking the appropriate checkbox(es). Then tap Bulk Changes and select either Enable VeriMy or Disable VeriMy.
Updating Assets via the Import Feature
VeriMy can be enabled when adding or updating assets using the AssetImport csv file. VeriMy can also be disabled in the same manner. Navigate to Home > Assets > Import Assets Upon launching the Import page, you will see a list of Required Fields as well as Optional Fields.
Important
All the Required Fields are necessary when importing new assets; however, when updating existing Assets, while other fields may be modified, the only Required Field is the Asset Number.
To prepare the Assets for Import,
Click on the Download Template button.
A .CSV file will be downloaded which contains all the fields available to you.
Complete the fields you wish to populate, keeping in mind those that are required.
- To enable VeriMy, Set the EnableVerimy TRUE
- To disable VeriMy, Set the EnableVerimy FALSE
Note
These values are not case sensitive.
Save the file.
Click the Browse button to search for the saved file.
Once located, click the Upload File button.
After the import has been processed, you will receive an email notification that shows the status of the import. This email will contain .txt files with both good and bad results that will assist you with correcting any import failures that may have occurred.
Using VeriMy
Device Assignments
Checking Out a Device
Launch the VeriMy app if the checkout screen is not displayed. Enter your IntelliTrack Username and Password, or Assignee ID and PIN (if displayed) as required according to your organization’s policy. Contact your Administrator with any questions.
Checking In a Device
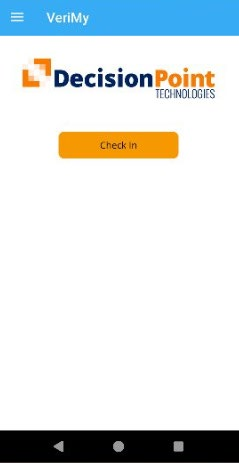
To Check in your device, tap the Check In button on the screen or cradle the unit.
Locating a Device
Working from the Web Console
You can notify users that a device is missing and send a message to the missing device to broadcast audio and visual signals from the IntelliTrack web console.
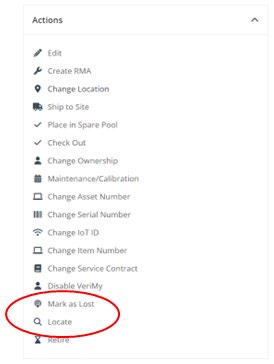
To notify users of a lost device, navigate to Home > Assets > Assets. Search for and select View for the missing device. Upon launching the View Asset page, you will see the action Mark as Lost. Note that you will only see this option if VeriMy is Enabled for the device. Tapping will send a notification to other users that the device is missing. Users will receive notifications if they have selected the option to “Receive Lost asset notifications” in the Settings menu in VeriMy Locate.
To have the missing device broadcast audio and visual alerts, navigate to Home > Assets > Assets. Search for and select View for the missing device. Upon launching the View Asset page, you will see the action Locate. Note that you will only see this option if VeriMy is Enabled for the device. Tapping will trigger the missing device to emit a loud signal and flash a message on the screen.
Using VeriMy Locate
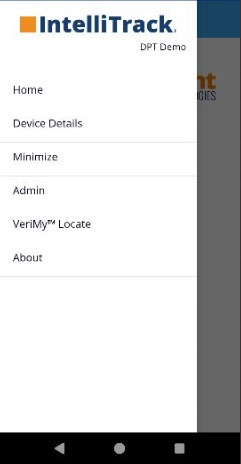
VeriMy Locate is available from the Hamburger Menu (three horizontal lines) at the upper left corner of the Android VeriMy application. Tap the Menu and select VeriMy Locate. After navigating to VeriMy Locate, you can notify users that a device is missing, send a message to the missing device to broadcast audio and visual signals, and use the RADAR feature to determine how close you are to the missing unit.
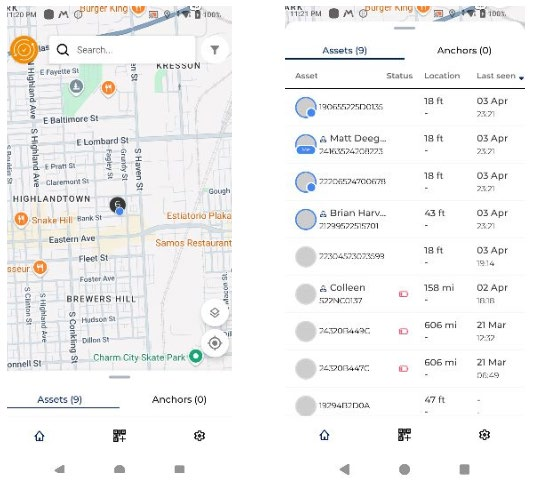
First, select the missing device in VeriMy Locate. To do this pull the Assets tab up to display a list of devices for your site. Scroll to find the correct device name, tap on the name and information about the device will appear on the screen. You will see buttons for Mark Lost, Alert, and RADAR.
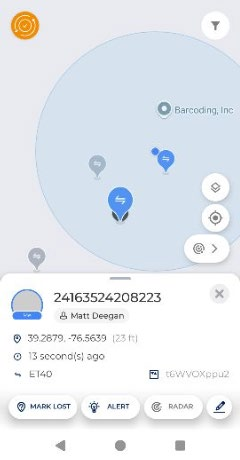
To notify users of a lost device, tap the Mark Lost button. Users will receive notifications if they have selected the option to receive notifications. Notifications will appear in the VeriMy app.
To have the missing device broadcast audio and visual alerts, tap Locate.
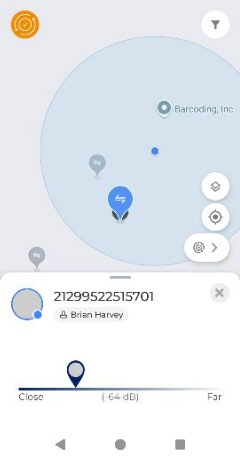
To determine how close you are to the missing device tap RADAR this will open a new screen with a scale that measures the proximity to the missing device. Walk with the screen open to determine if you are getting nearer or further to the device.
Related
- VeriMy™ Release Notes 3.0.8 – 2.7.3 — the releases that integrated VeriMy Locate into the app
- Upgrade to VeriMy 3.2.4 or Higher — faster check-outs and check-ins and a single login method
- VeriMy Load Test Report – Technical Summary — recommended limits for enabling VeriMy in bulk